
Certificates: Easier Than You Think!
Today, we will guide you through setting up an Enterprise Certificate Authority with an offline Root CA. We will begin by configuring the Root CA, then proceed to set up the Subordinate CA.
Assumptions
We assume the domain is already created and you have a user with the enterprise admin role. If you have an existing CA and want to replace it, you can create the new CA alongside the old one using different names without any issues. This is the process we followed to achieve a best practice configuration. You will need two VMs or one VM and one physical server. We recommend keeping the Root CA virtual since it will only be powered on occasionally to create Subordinate CA certificates and to copy the CRL to the Subordinate CAs. The Subordinate CA will handle all certificate workloads, and we suggest adding a secondary hard drive dedicated to log files. These logs can grow quickly if you issue thousands of certificates annually. Now, let’s get started with the setup!
RootCA Setup
This server will not be joined to the domain. The server must be renamed before proceeding. We chose a straightforward name: RootCA-“company name”. Once renamed, we can continue to the next step.
Roles and Features – RootCA
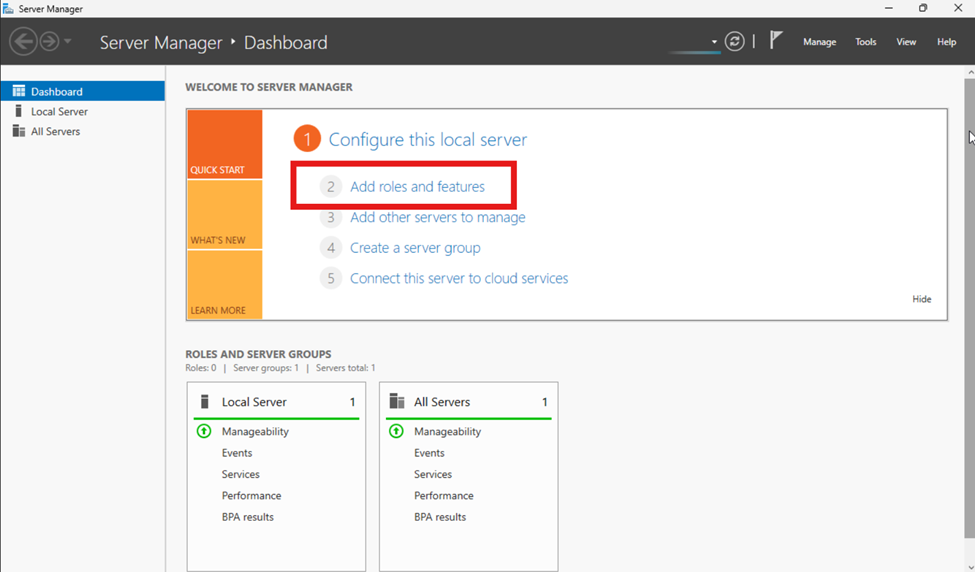
In Server Manager, select “Add roles and features”.
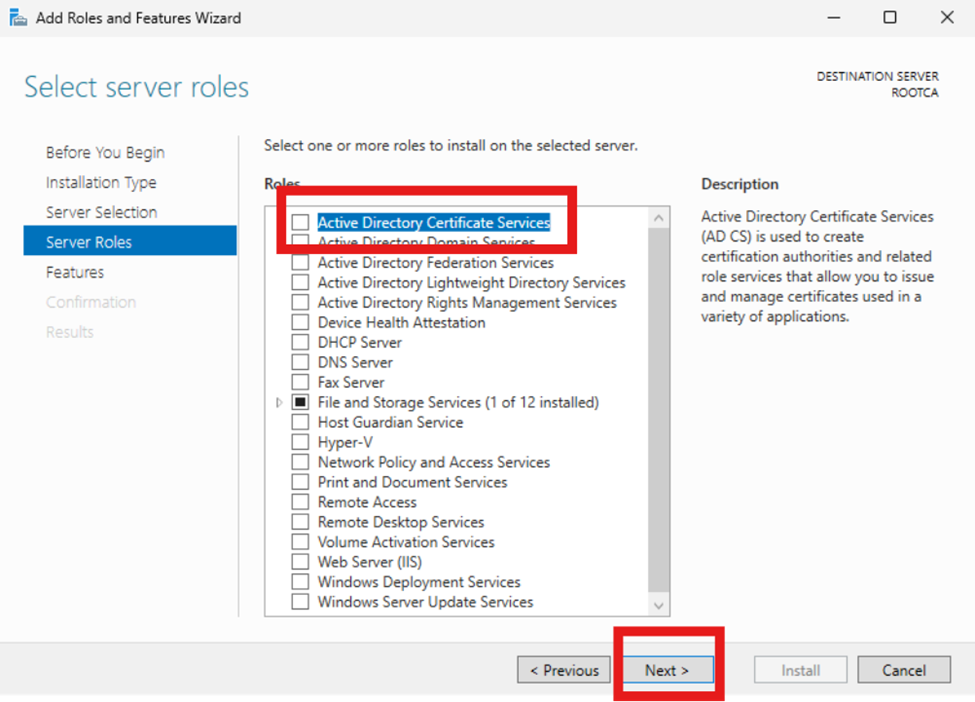
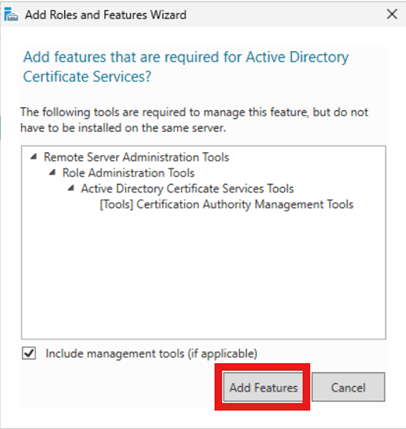
Now we will go through the wizard. Click “Next” on the first three screens then click on “Active Directory Certificate Services”. You will get a popup click “Add Features”.
RootCA:
After the popup we will click “Next” and “Next” again. Select the “Certificate Authority” option on the following page. After that click “Next” and “Install” to finish this section up.
SubCA:
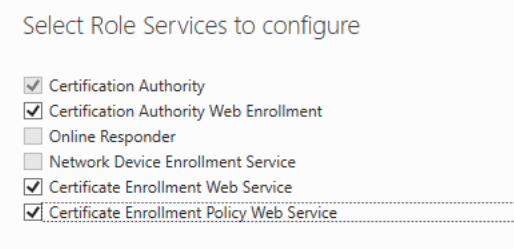
Next page we will want to select the following:
Certificate Authority
Certificate Enrollment Policy Web Service
Certificate Enrollment Web Service
Certificate Authority Web Enrollment
*Note: after each one is checked make sure to click “Add features” on the popup.
Click “Next” on the “Web Server Role” page and “Select Role Services” page. Click “Install” and continue to next section.

Coffee Time!
Please wait for the installation to complete. Feel free to take a short break, as this may take several minutes. Once the installation is finished, close the window, and we will continue with the configuration in the next section. If you are working on the SubCA, click the button to return to Configuring Certificate Authority – SubCA.
Configuring Certificate Authority – RootCA
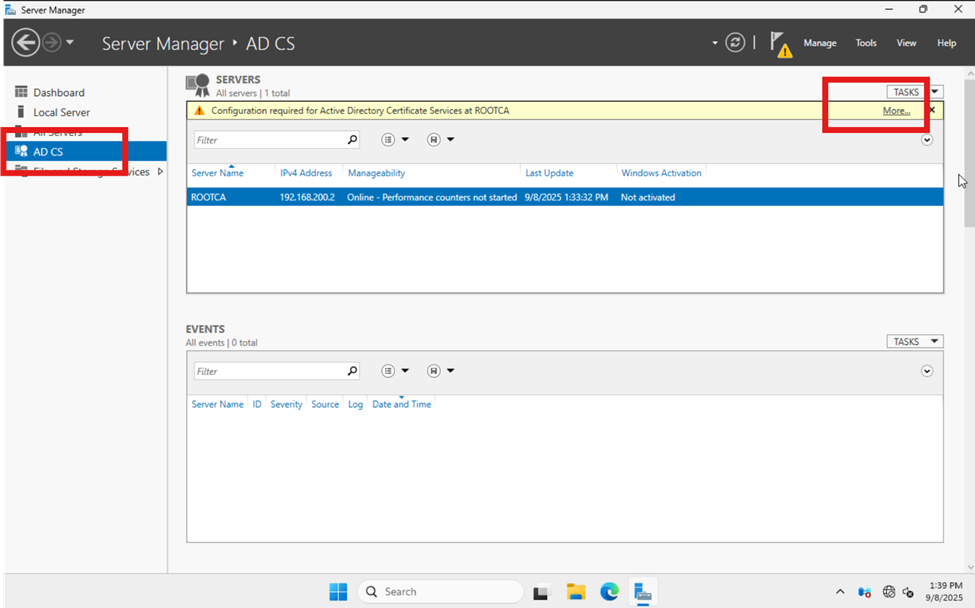
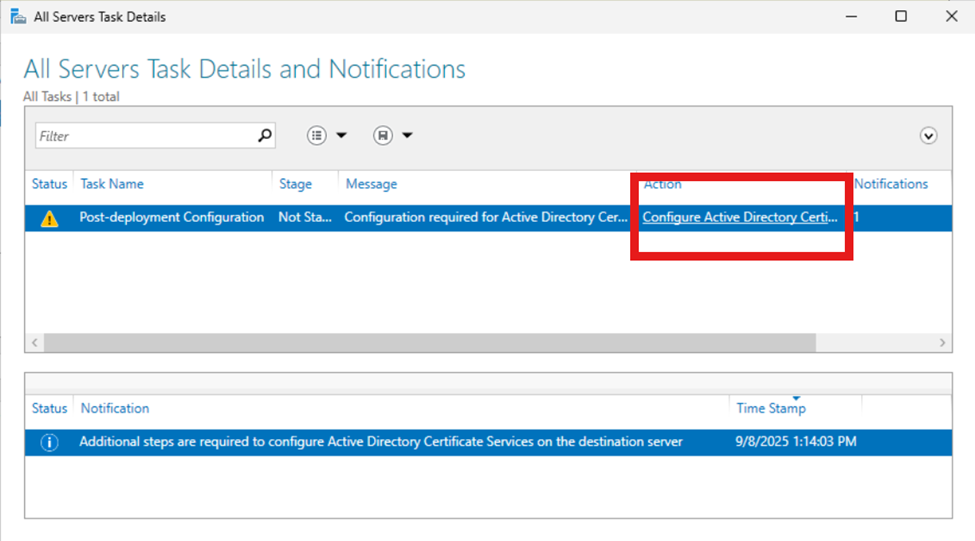
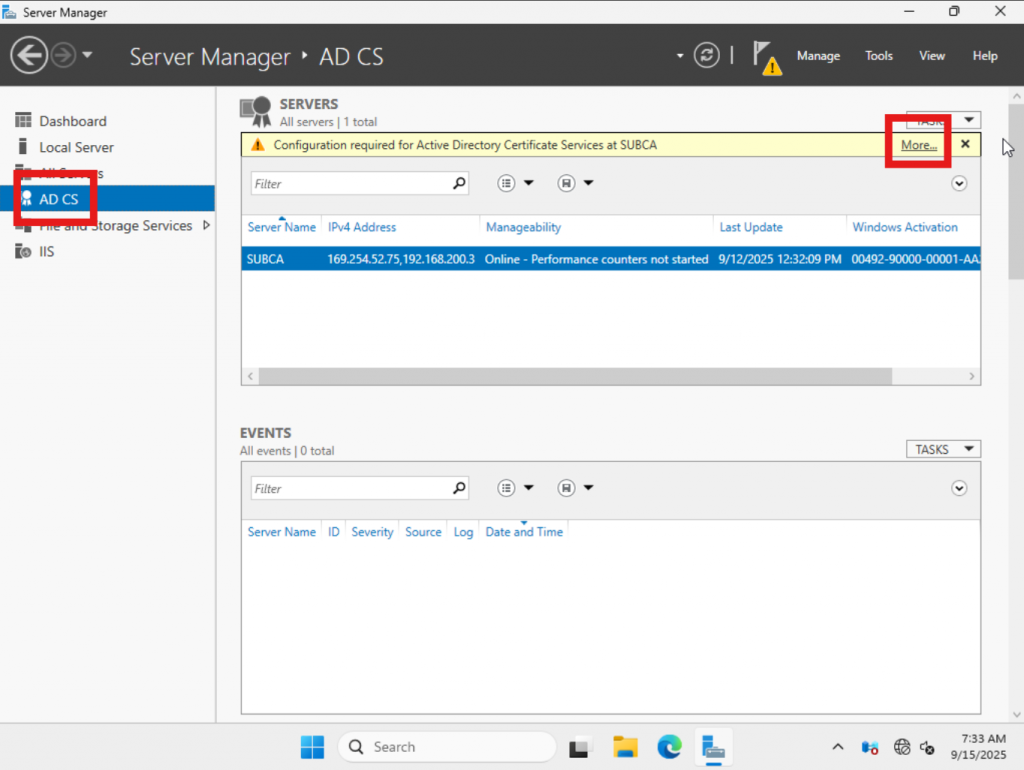
Let’s start the configuration process. In Server Manager, click the “AD CS” tab. Next, select “More…” at the top right corner. See the image below for reference. Detailed instructions are provided for both the Root CA and the Sub CA—please follow the steps for the server you are setting up. Keep in mind, the Root CA must be created before the Sub CA.
Now you will see a pop up and we will want to look for the link “Configure Active Directory Certificate Services…”. Click the link and follow along.
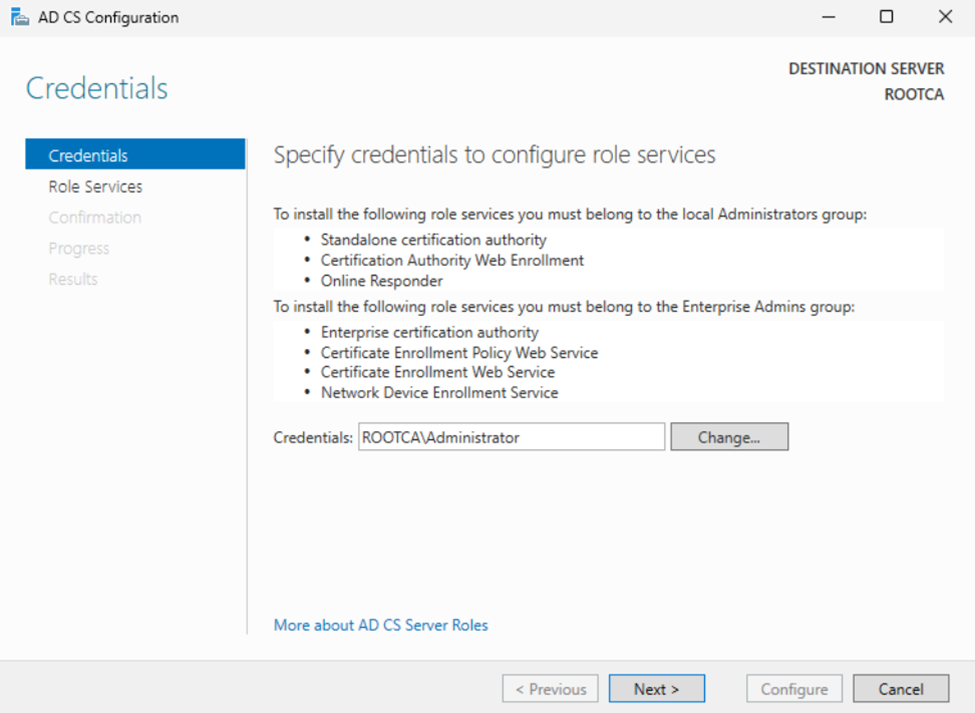
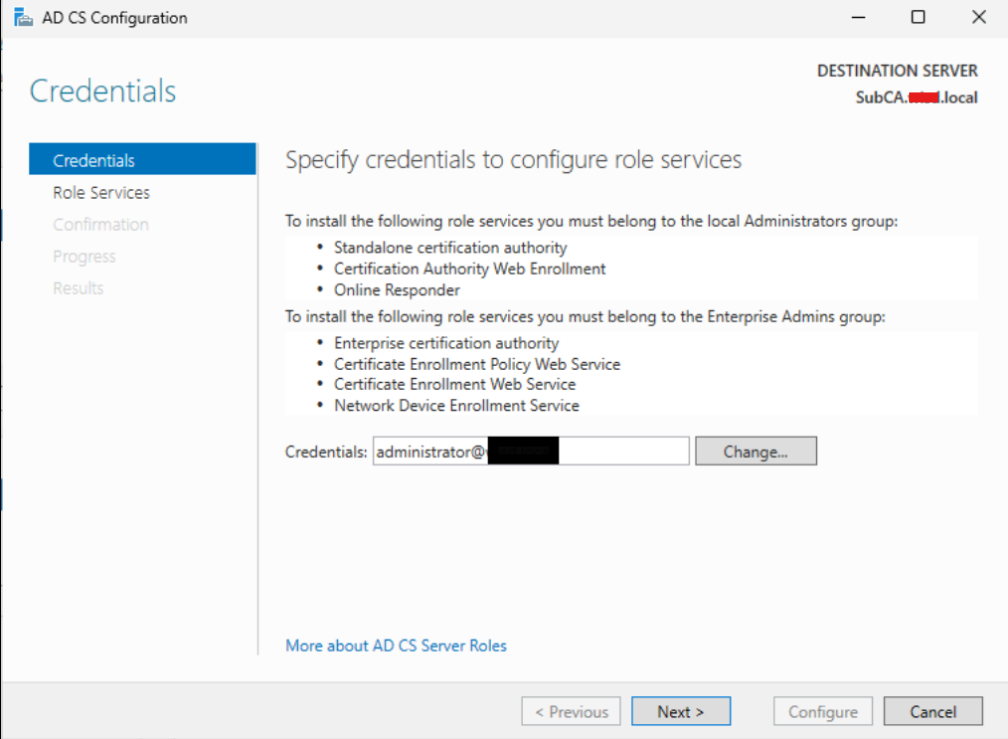
On this screen we need to enter the credentials for our Enterprise Admin. Since this is just a server I spun up for this article I will keep the default and click “Next”.
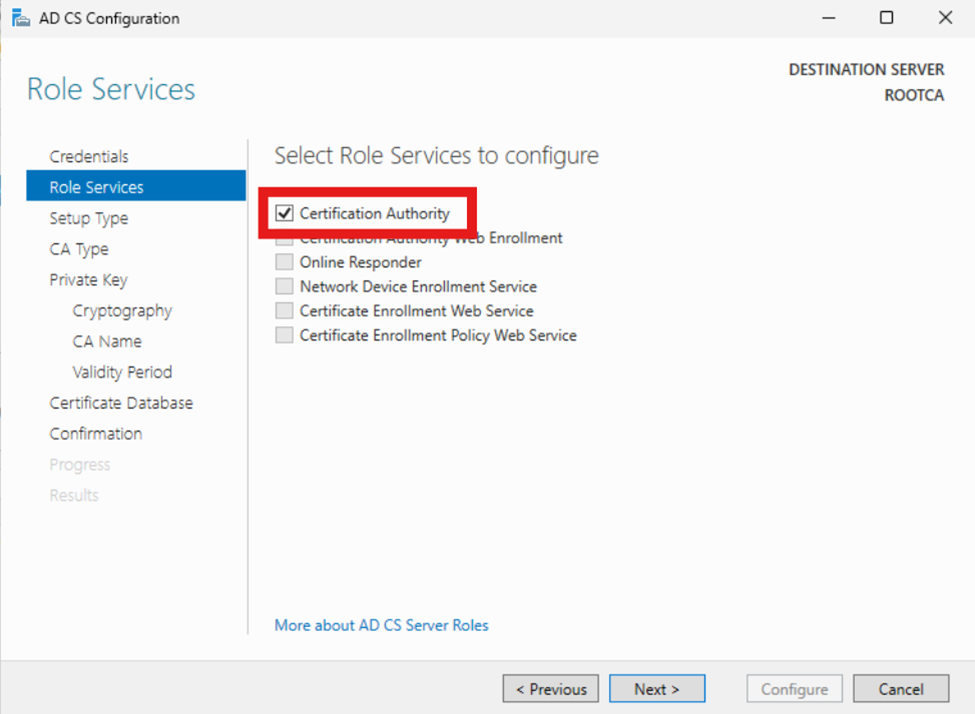
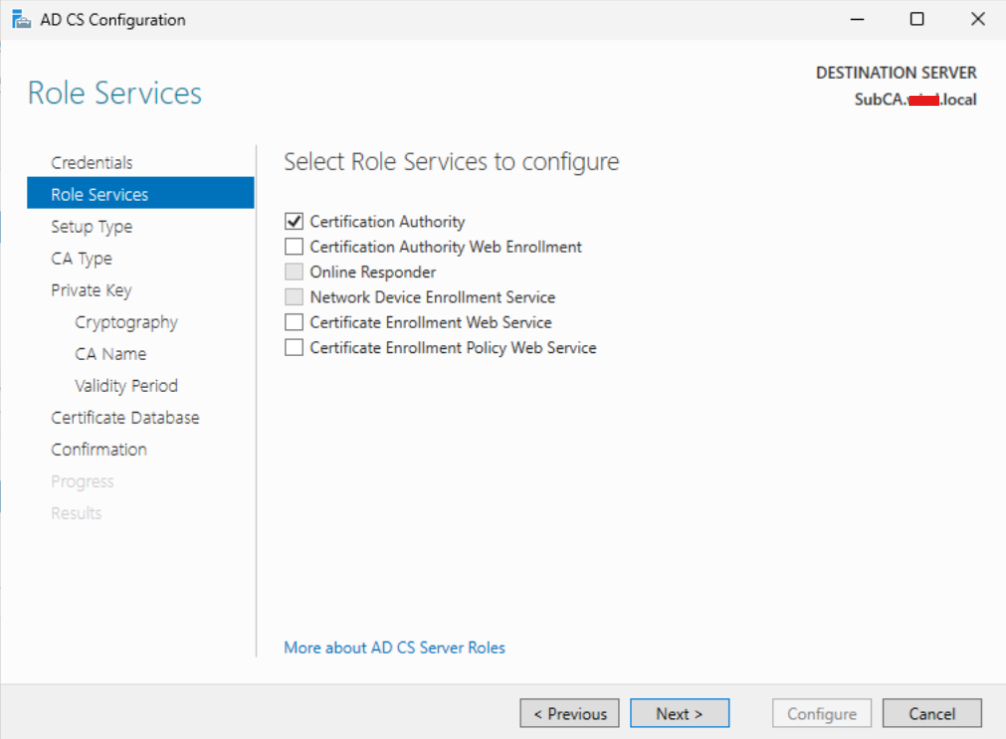
RootCA: Next page we will check the “Certificate Authority” box only and click “Next”.
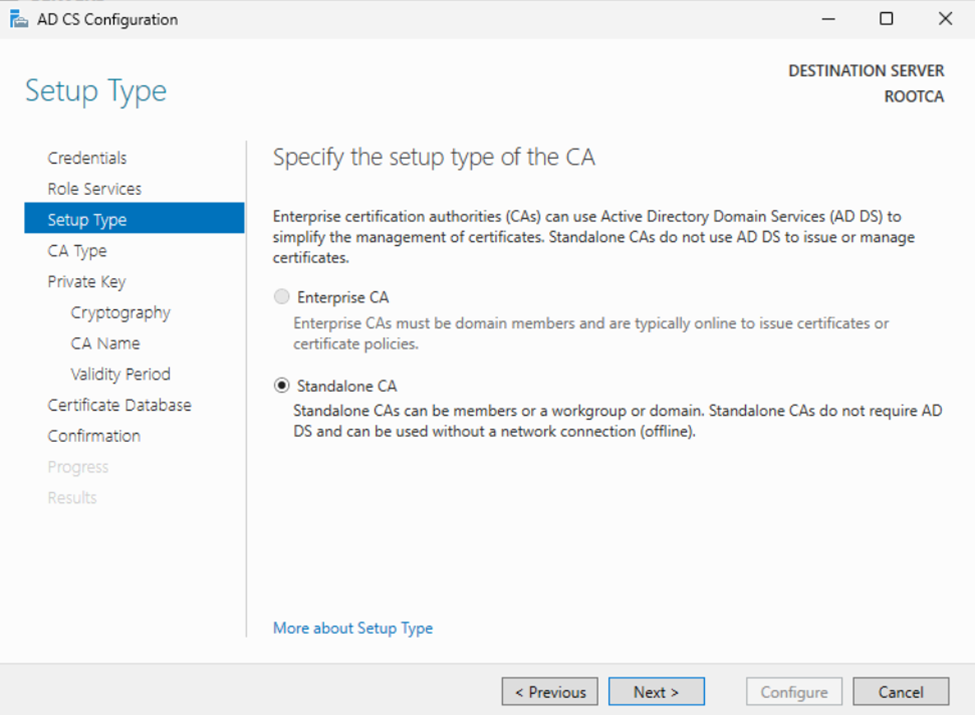
RootCA: This next page we have no options. Keep it “Standalone CA” and click “Next”.
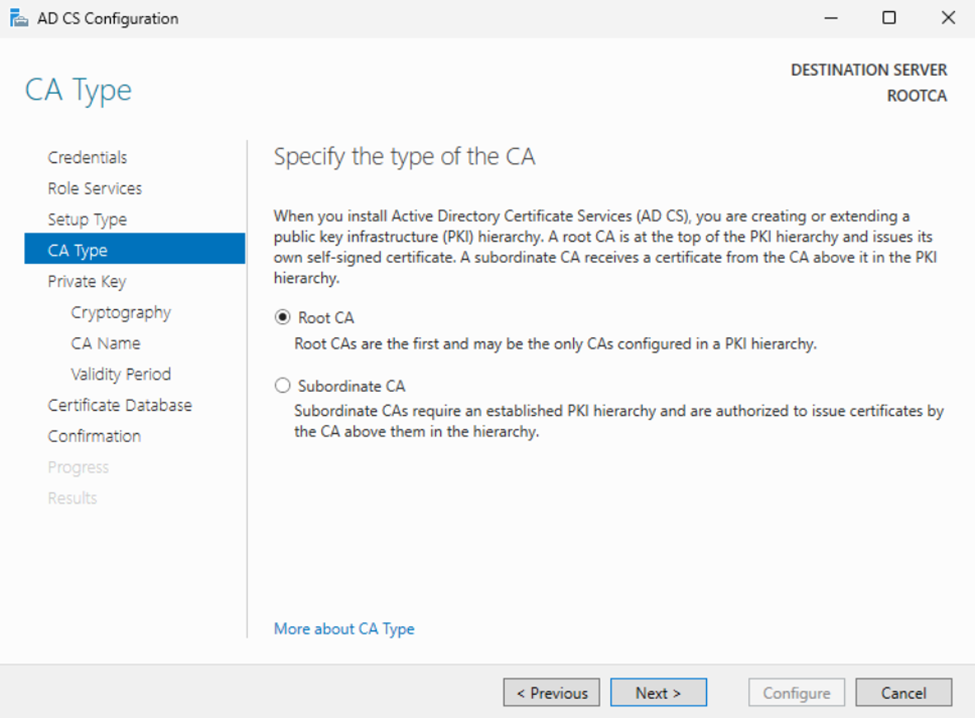
RootCA: This next page is important. If we are configuring the RootCA make sure to choose “Root CA” and click “Next”.
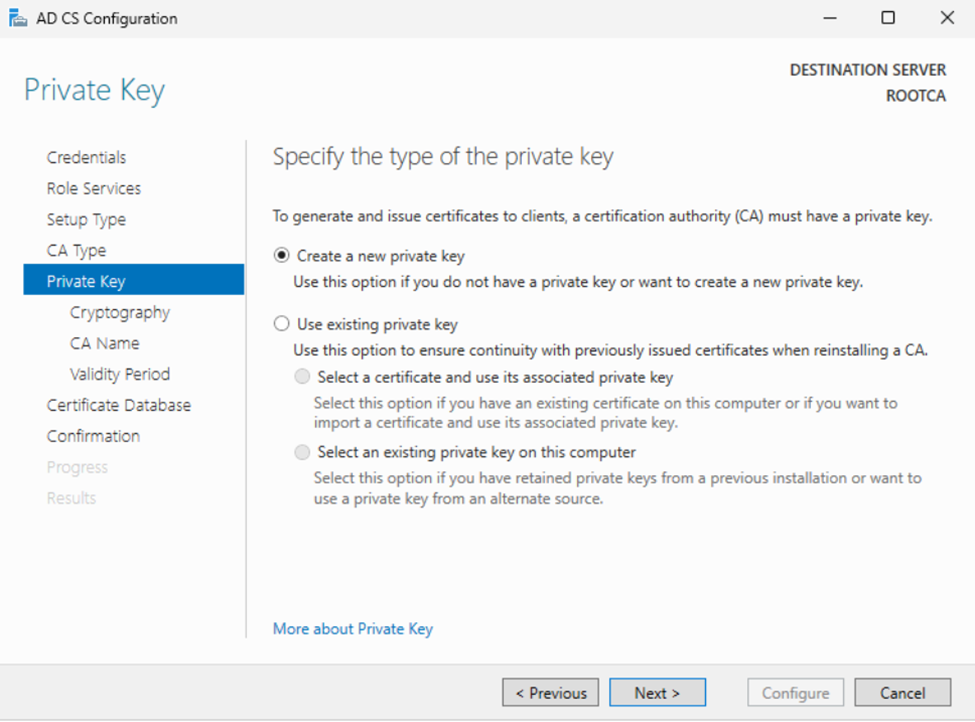
RootCA: Here we will select “Create a new private key” and click “Next”.
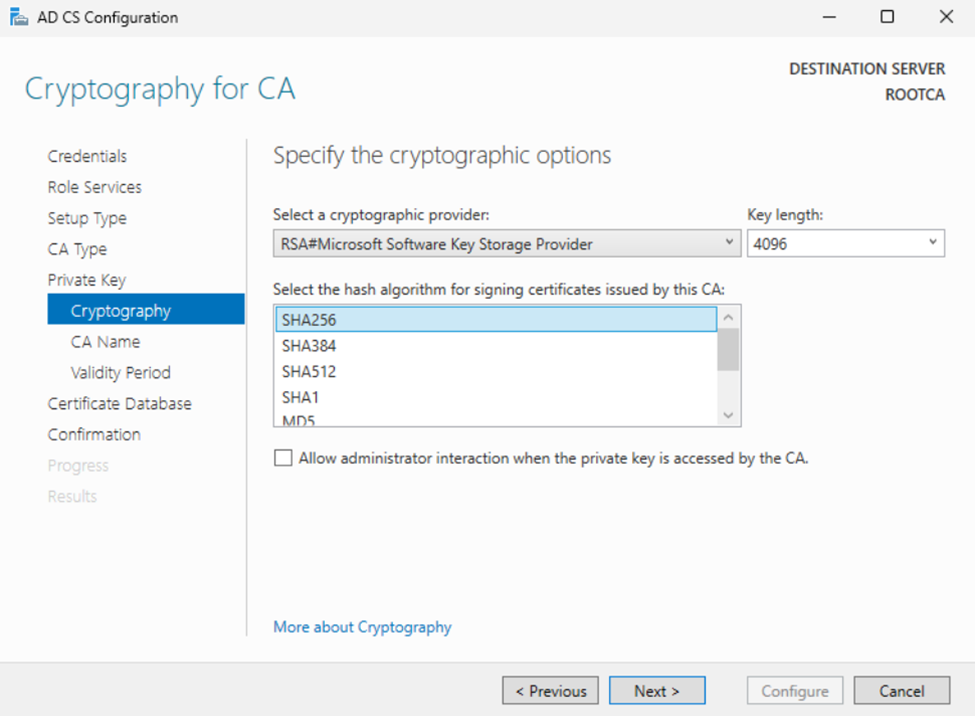
RootCA: On the Cryptography tab select your options. At the time of writing “SHA 256” with a 4096 key was still recommended. Click “Next” when completed.
RootCA: The CA name needs to be unique for your organization. I am using ROOTCA-LOCAL as an example. Something as simple as ROOTCA-COMPANY_NAME would be sufficient.

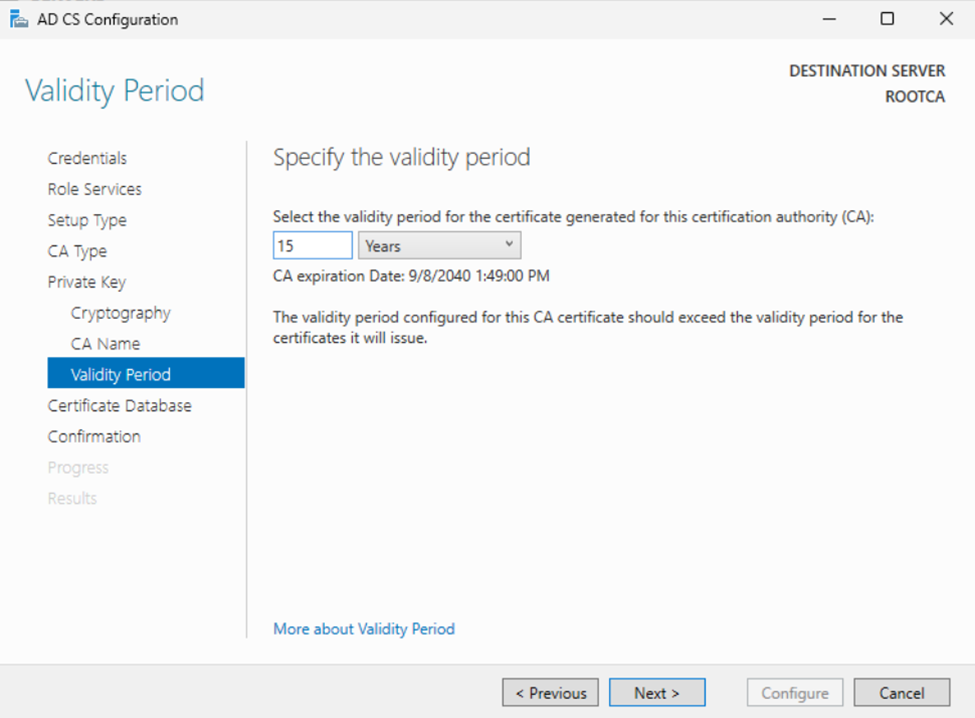
RootCA: At the time of this writing, since the ROOT CA will be offline and secured a validity period of 15-25 years is recommended.
You can change the log location on the next page. However, since the server will only be issuing Sub CA certificates, I recommend leaving it as is. Let’s go ahead and click “Next.”

Finally we can click Configure and wait for the system to complete.
Configure RootCA Extensions
We will not include images for this section of the how-to guide, but if you encounter any difficulties, please let us know and we may add them later.
On the RootCA server, open the “Manage Computer Certificates” snap-in by searching for it in the Start menu.
Right-click your RootCA server name and select “Properties.”
In the Properties window, go to the Extensions tab. Ensure “CRL Distribution Point (CDP)” is selected, then click “Add.”
In the Location field, paste the following, replacing “MY_SUBCA_NAME” with your SubCA server name. Click “OK,” then choose the options highlighted in the image below.
http://MY_SUBCA_NAME/CertEnroll/<CaName><CRLNameSuffic><DeltaCRLAllowed>.crl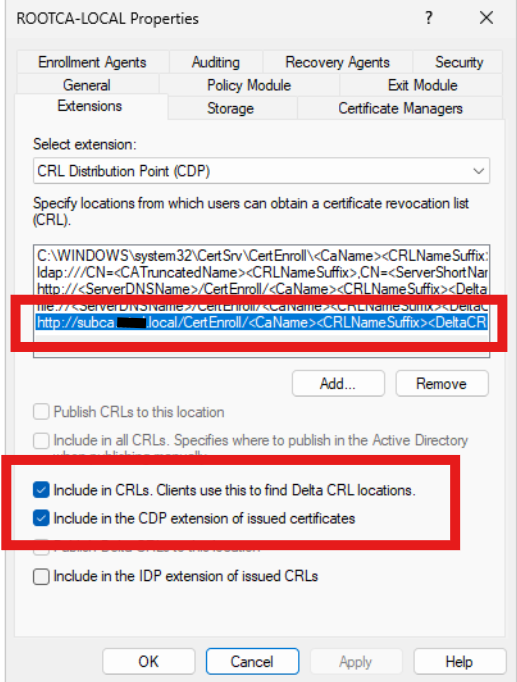
Next, update the Authority Information Access (AIA) link by selecting “AIA” under the “Select Extension” menu. As before, replace the server name in the specified line. Click “Add,” paste the updated line into the “Location” field, and click “OK.” Then, select the options shown in the image below and click “Apply.”
http://MY_SUBCA_DNSNAME/CertEnroll/<ServerDNSName>_<CaName><CertificateName>.crt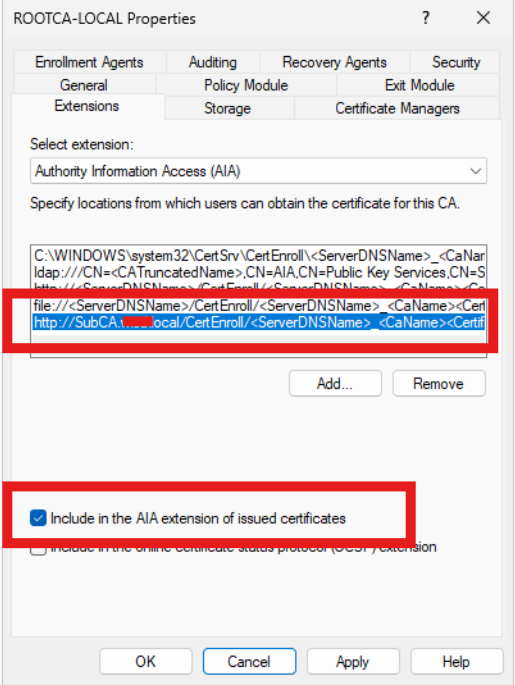
Once those are done click “OK”. If asked to restart the certificate service say yes.
Increase the validity of the CRL
By default, the CRL is valid for only one week. To avoid having to activate the offline root and transfer the CRL weekly, we recommend extending its validity period. We chose to set it to one year using the following PowerShell commands executed on the Root CA.
certutil -setreg CACRLPeriodUnits 1
certutil -setreg CACRLPeriod "Years"
net stop certsvc
net start certsvc
If you prefer a shorter option, consider using “Months” or “Weeks.”
Export RootCA Certificate
We will not include images for this section of the guide, but if you encounter any difficulties, please let us know and we may add them later.
In Windows search for “Computer Certificates”, once the window opens, navigate to “Personal” -> “Certificates”. Find the RootCA certificate you created, right-click it, then choose “All Tasks” followed by “Export”.
In the wizard, click “Next”. Choose “No, do not export the private key”, then click “Next”. Select “Base-64 encoded X.509 (.CER)”, click “Next”. Click “Browse…”, choose a save location, enter a filename such as RootCA, click “Save”. Click “Next”, then “Finish”, and finally click “OK”.
Export RootCA CRL
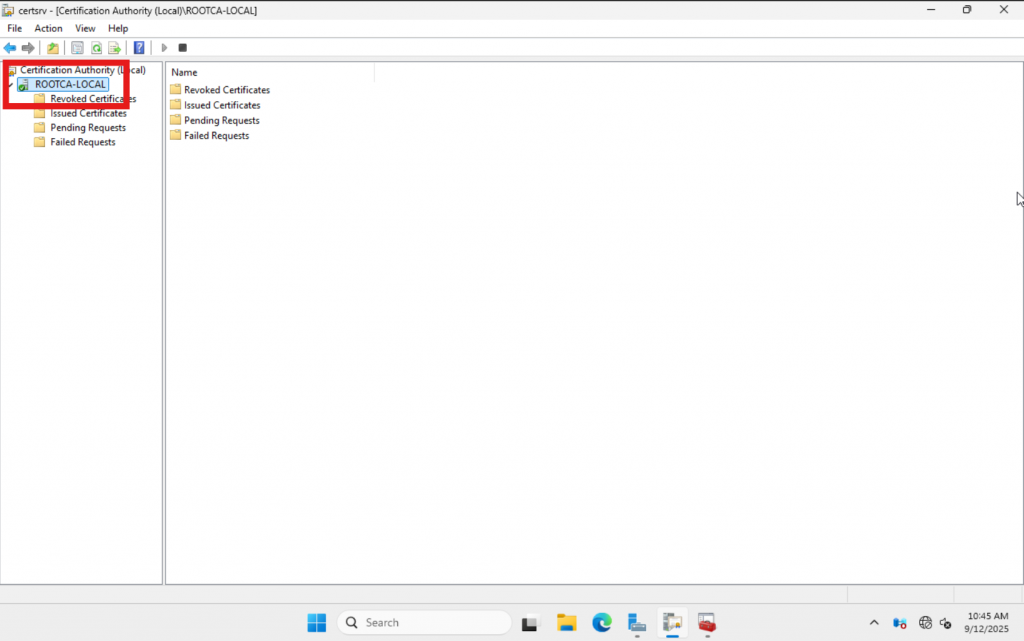
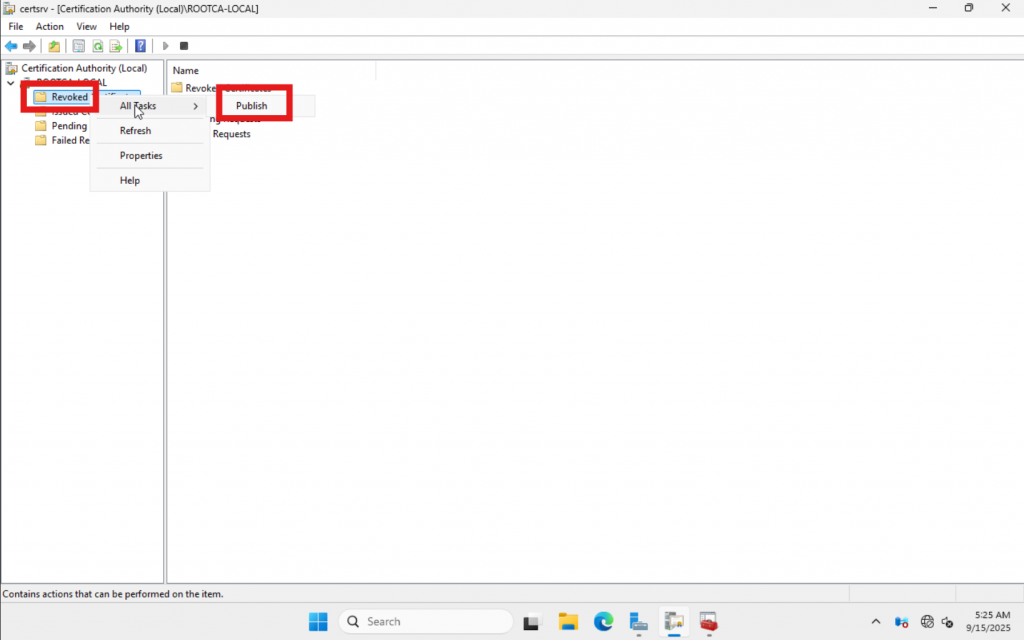
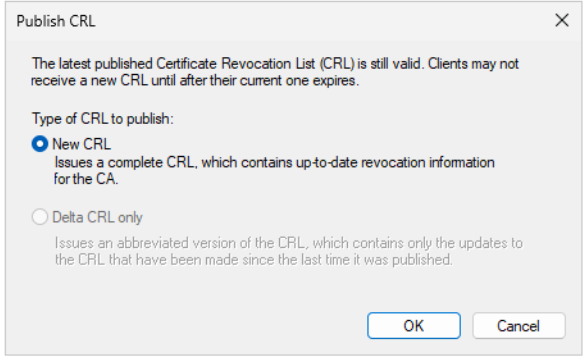
Open Certificate Authority on the RootCA. Right click on “Revoked Certificates” and click “Publish”.
Select “New CRL” and click “OK”.
Next, navigate to “C:WindowsSystem32CertSrvCertEnroll” and copy the file with the type “Certificate Revocation List” or “.CRL” to your desktop. This file, along with the RootCA certificate we obtained earlier, will be required for the SubCA.
Configuring Certificate Authority – SubCA
Now let’s begin setting up the SubCA. Assumptions and requirements: The SubCA must be named appropriately and joined to the domain. It is recommended to add a second hard disk dedicated to logs. Let’s get started.
We will follow the same initial steps as for the RootCA. Please pay close attention to the specific SubCA steps outlined below. Click the button below to jump back up.
Configuration – SubCA
Hope you enjoyed that long break! Now lets keep it rolling along.
Setting up Subordinate CA
On the Server Manager page lets click on “AD CS” followed by “More…” in the upper right side of the screen.
Click on “Configure Active Directory Certi…”.

On the first page of the wizard we need to click “Change” and update the credentials for the Enterprise Admin of the domain. Then click “Next”.
We will go ahead and check “Certificate Authority” and click “Next”.
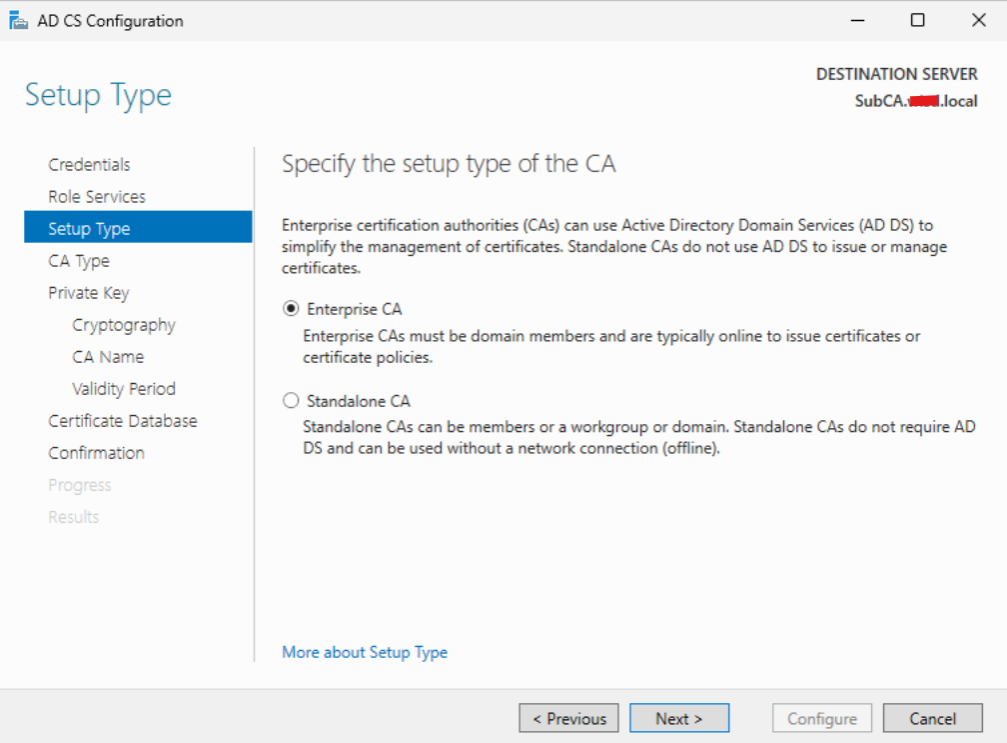
Select “Enterprise CA” and click “Next”.
Select “Subordinate CA” and click “Next”.

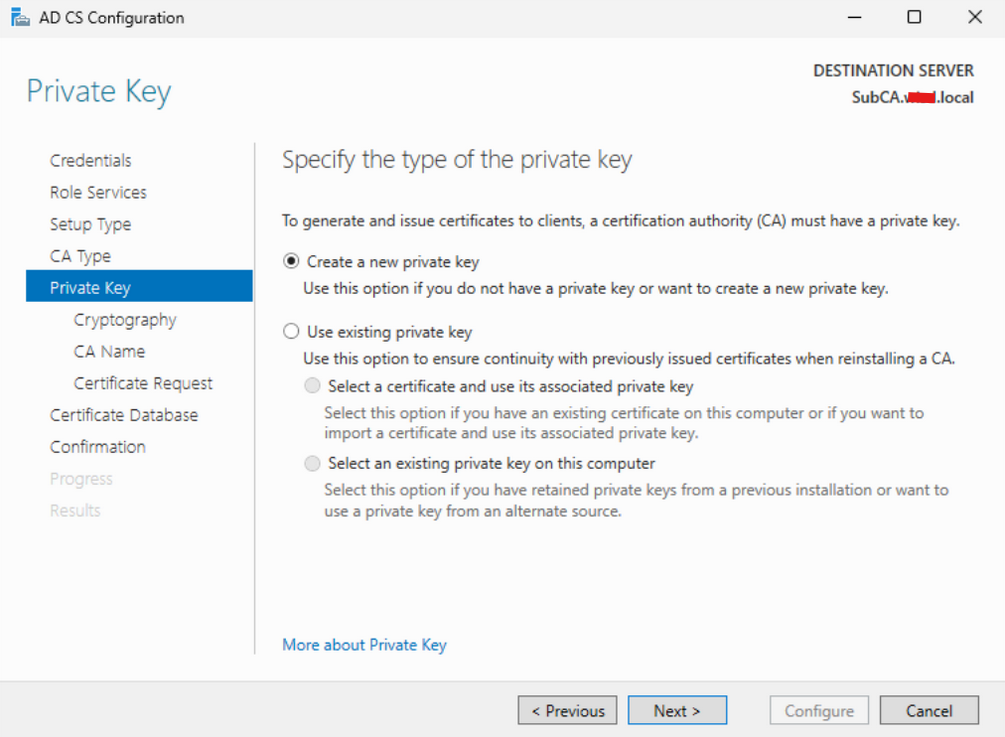
On the Private Key page, select “Create a new private key” and then click “Next.”
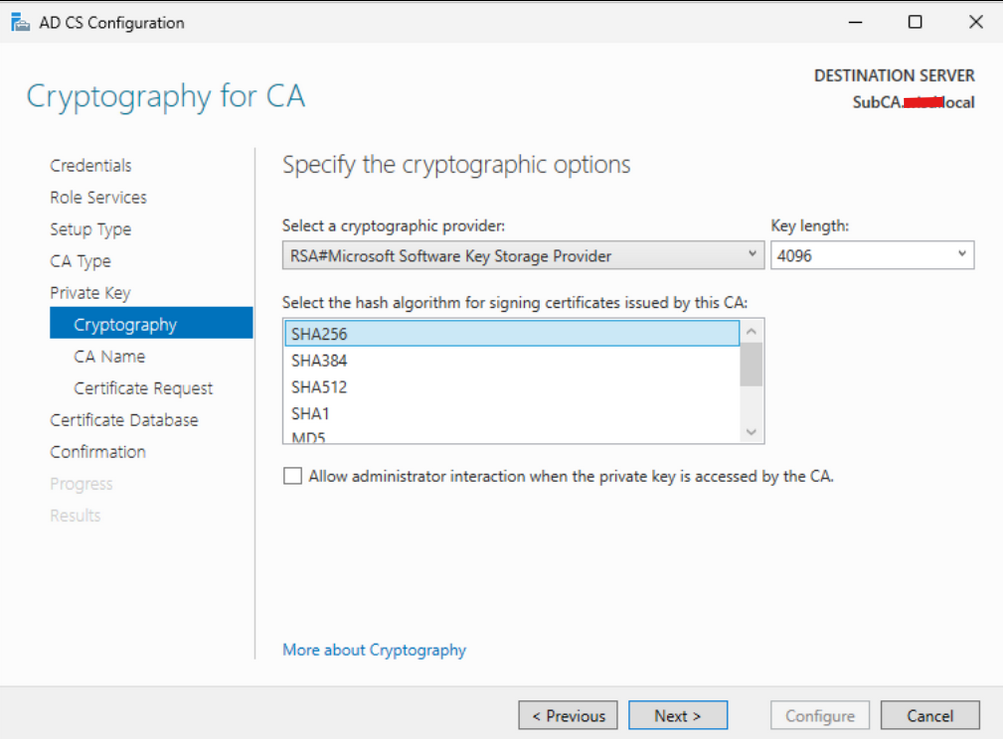
On the “Cryptography for CA” page, use the same settings as the RootCA. Choose “SHA256” as the algorithm and set the key length to 4096. When finished, click “Next” to proceed.
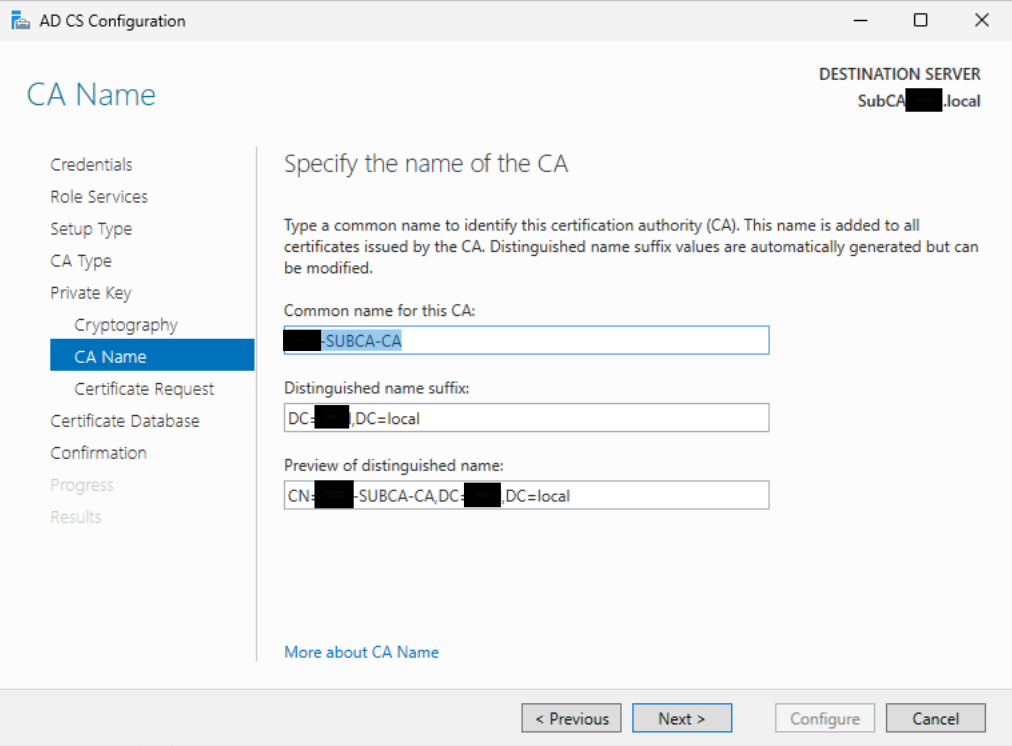
On the “CA Name” page, we reviewed the pre-filled information. Satisfied with the default settings, we proceeded by clicking “Next.”
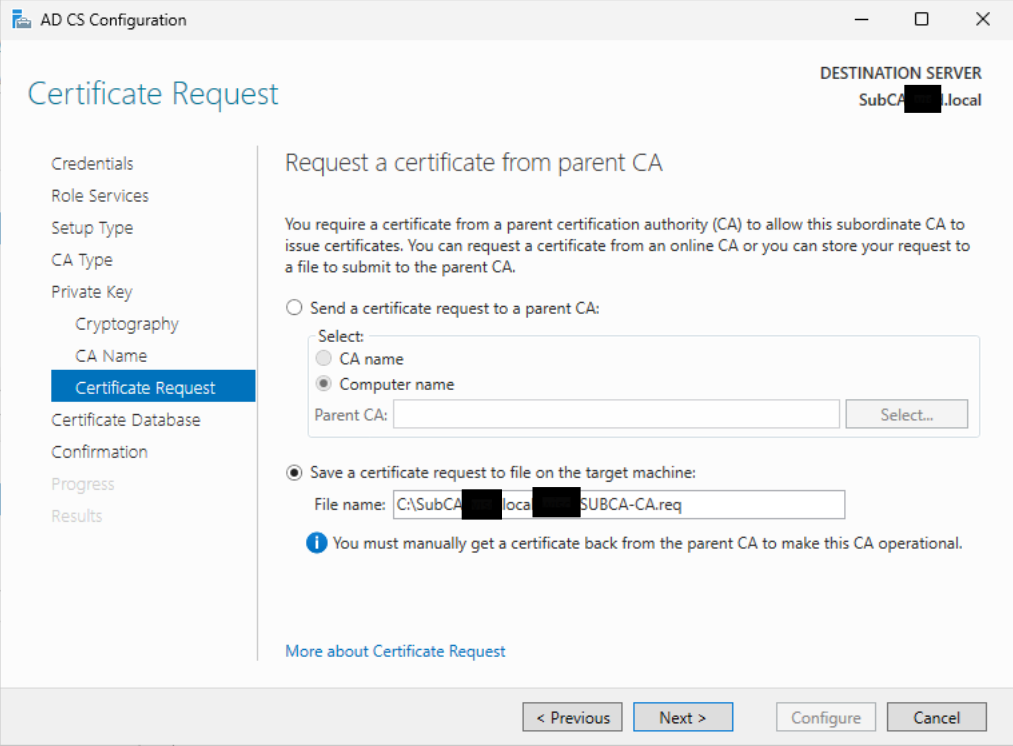
On the “Certificate Request” page, select “Save a certificate request to file…” and either note the default location or change it to the desktop. Once you are satisfied with the location, click “Next”.
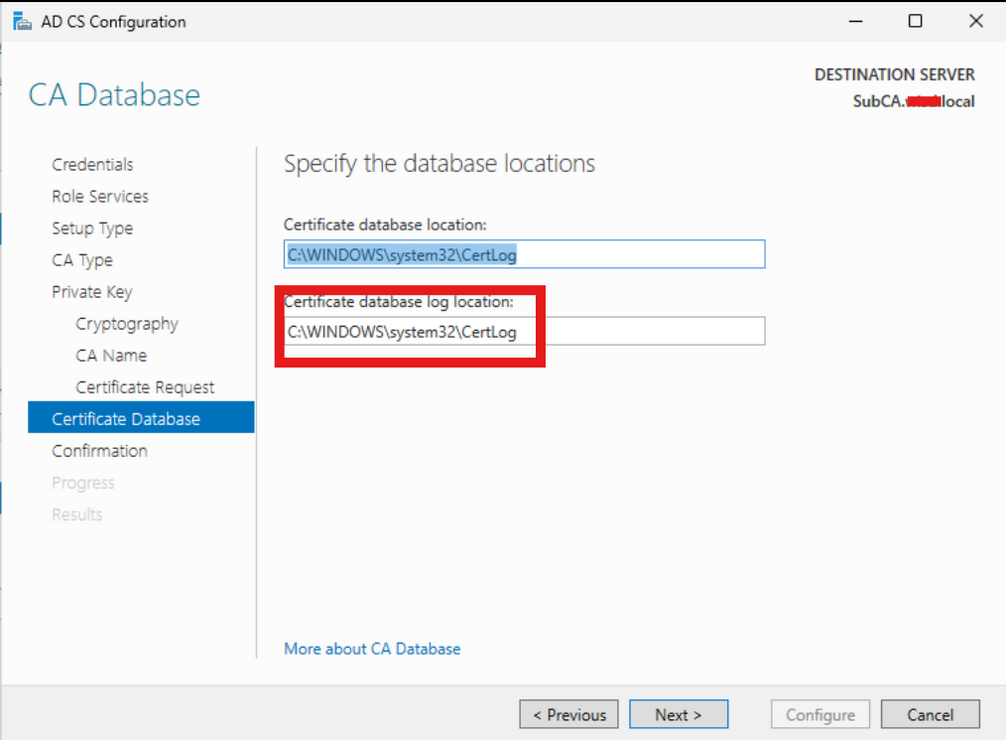
On the “CA Database” page, as previously suggested, I recommend changing the log location to a secondary hard drive. However, since this is a demo, we will simply click “Next.”
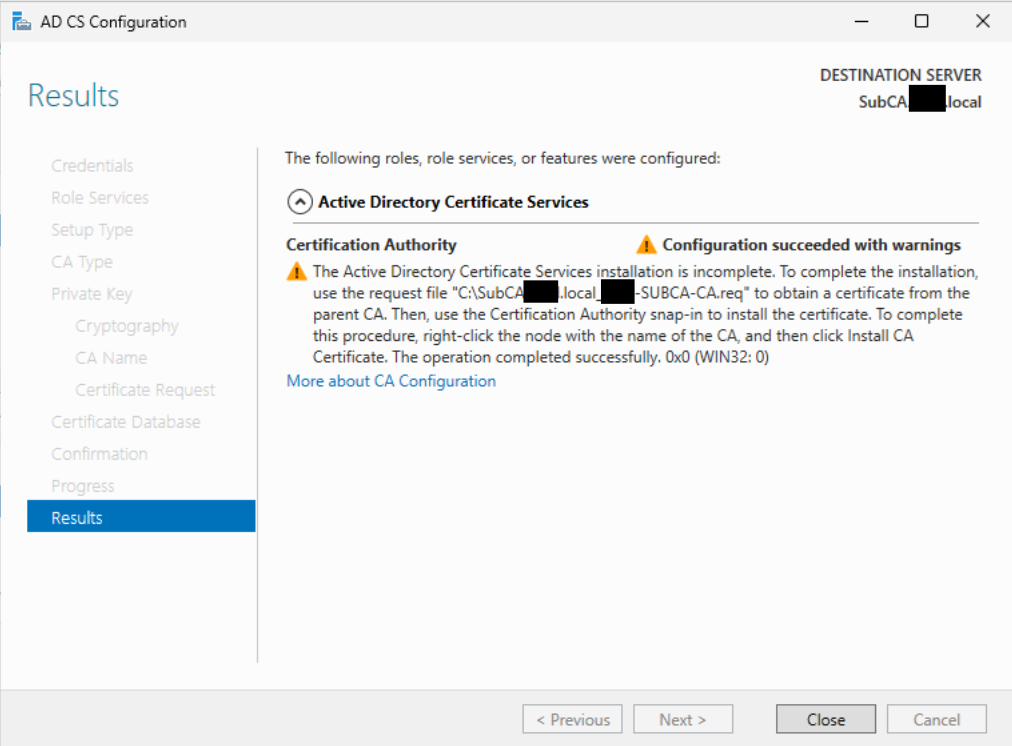
On the final page, review your configuration settings and click “Configure.” After completion, you should see the warning below. Next, we will proceed to request a certificate.
Generating the SubCA Certificate.
Next, we need to transfer the Certificate Request file to the RootCA. Since both machines are on the same network in our setup, I accessed the RootCA’s C$ share and placed the file there. If you choose this method, drop the file on the user’s desktop and keep the folder open on the SubCA. This will simplify copying the necessary files later.
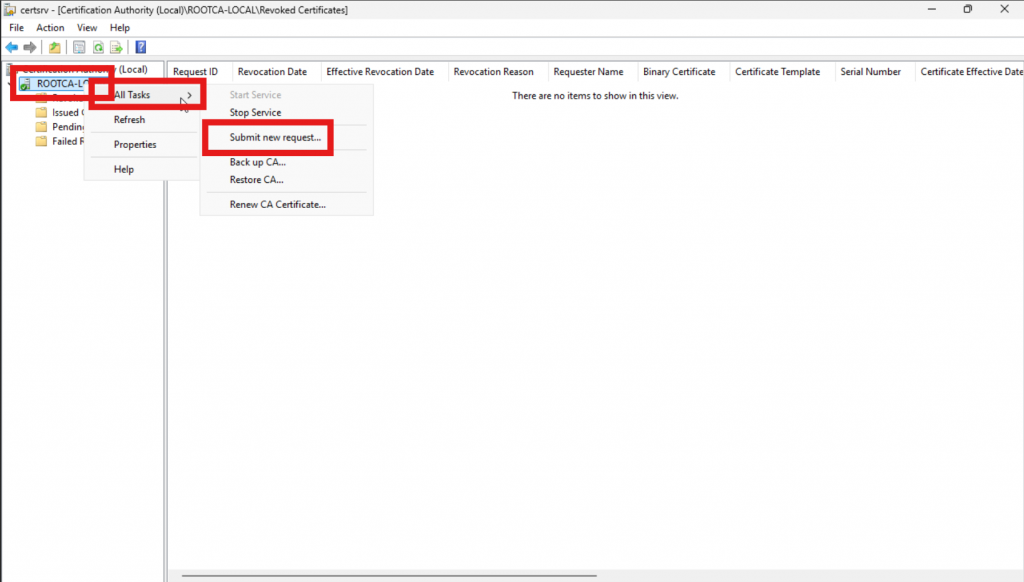
On the RootCA, open the Certificate Authority application, right-click the server name, select “All Tasks,” and then click “Submit new request.”
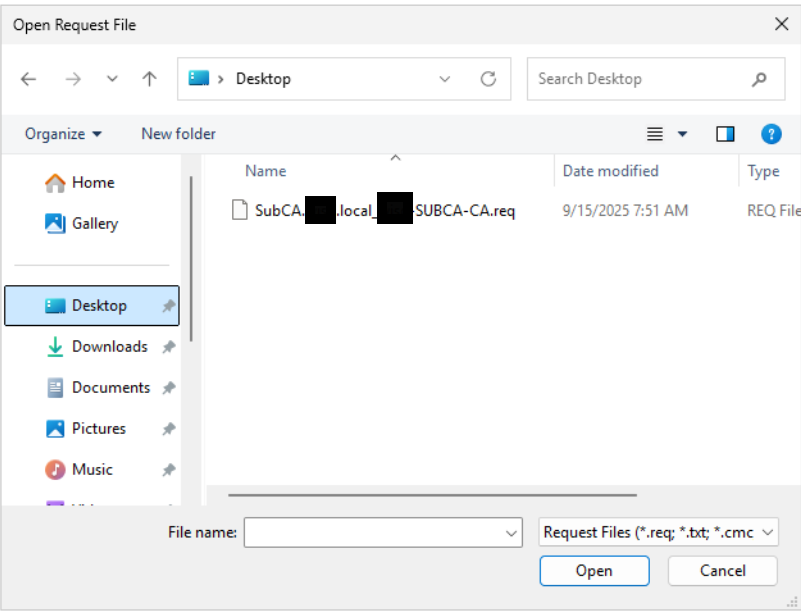
Locate the file with the “.req” extension that we transferred and click “Open”.
Right-click your server name and select “Refresh.” Then, navigate to “Pending Requests,” right-click the request, choose “All Tasks,” and click “Issue.”

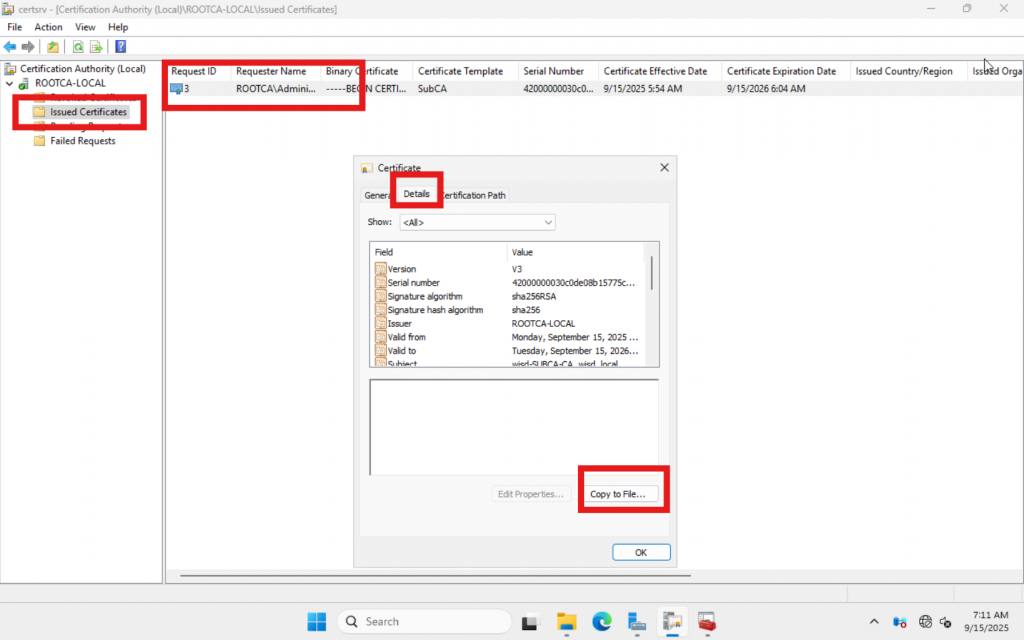
Next, export the certificate as a p7b file. Navigate to “Issued Certificates,” then double-click the issued certificate or right-click and select “Open.” In the window that appears, go to the “Details” tab and click “Copy to File…”
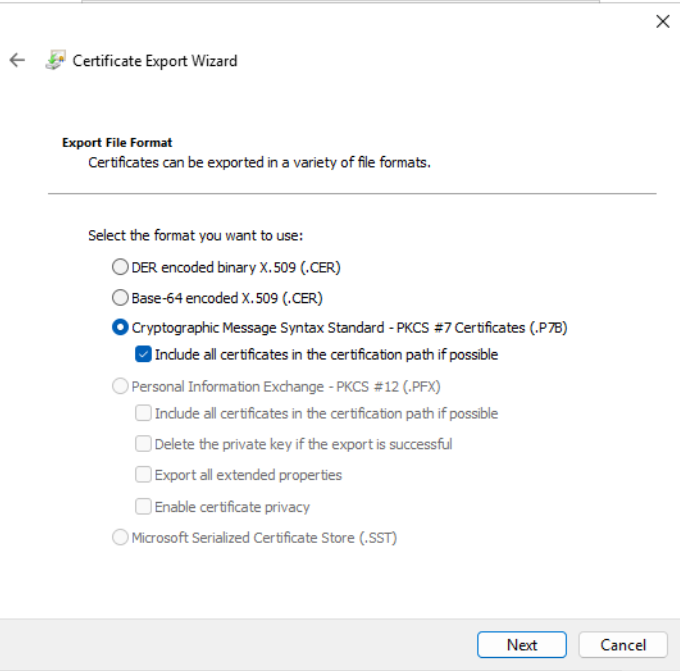
On the “Certificate Export Wizard,” click “Next,” choose “Cryptographic Message Syntax Standard,” check the box labeled “Include all certificates in the certification path if possible,” and then click “Next.”
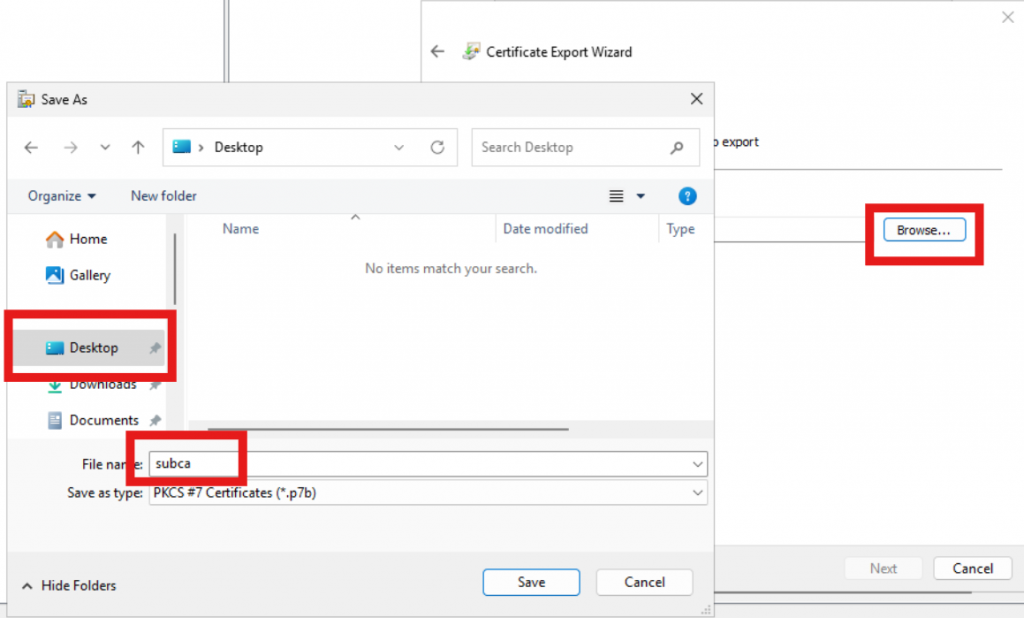
On the “File Export” page, click “Browse” and choose a location. We recommend using the “Desktop” folder to save all files for easy transfer to the SubCA. After selecting the location and naming the file, click “Save,” then proceed by clicking “Next,” “Finish,” and “OK.”
Copy the CRL file, “.p7b” file, and the rootCA certificate to the SubCA.
Finish Setting up SubCA
On the SubCA server, open the “Certificate Authority” application. Right-click the server name, select “All Tasks,” and then click “Install CA Certificate.”
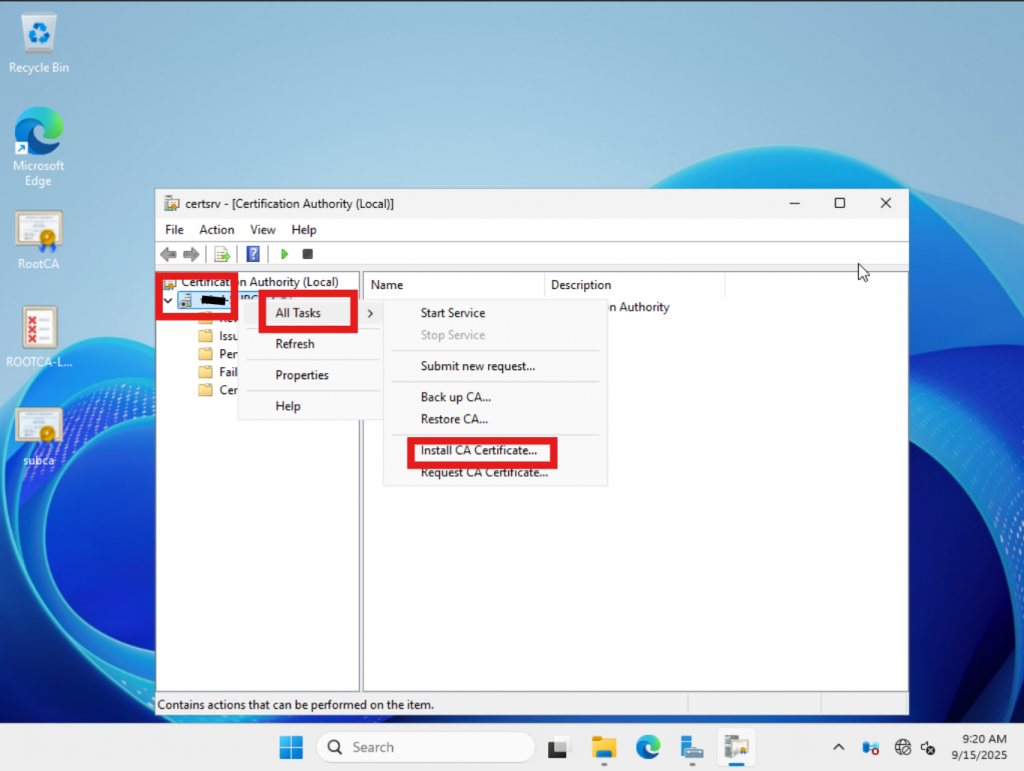
In the pop-up window, navigate to the location of the “.p7b” file, select it, and click “Open.” After importing, right-click on the server name, choose “All Tasks,” and then click “Start Service.”
Installing other CA components.
Now that we have reviewed the next steps several times, I will omit the images and provide only the steps.
In Server Manager, select “AD CS,” then click “More…” and choose “Configure Active Directory Certificate Services…”
Change the Credentials to your “Enterprise Admin” account. Then click Next. Select the checkboxes for the remaining Roles you want to configure.
On the “CA for CES” page, ensure that the “CA name” dropdown is set to the sub CA you created. Then, click “Next”.
On the “Authentication type for CES” page, select “Windows Integrated Authentication” and then click “Next.”
On the “Service Account for CES” page, because all roles are hosted on the same server, select “Use the built-in application pool identity” and then click “Next”.
For the “Authentication type for CEP,” select “Windows Integrated Authentication” and then click “Next.”
On “Server Certificate” page, choose an existing certificate by clicking the one available in the window and click “Next”.
On the “Confirmation” page, click “Configure.” After all tasks display “Configuration succeeded,” you may click “Close.”
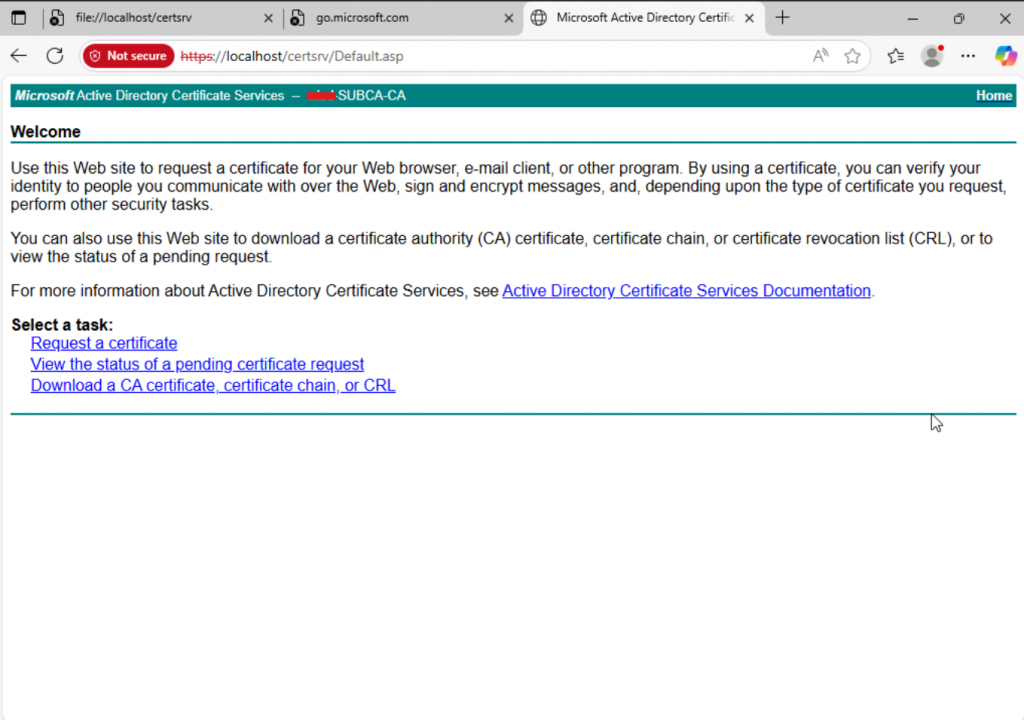
Test Configuration
Open a web browser and navigate to https://my_server_name/certsrv. You might encounter a certificate error—don’t worry, we’ll address that shortly. Simply accept the warning and proceed. If everything is set up correctly, you should see a page similar to the one below.
Conclusion
The server setup is not yet complete. We still need to configure certificate templates and set up any necessary connectors for Google or Intune. These details will be shared soon. This has been a lengthy post, so take a well-deserved break. Thank you, and we hope you join us for our next post on Templates and Connectors.